
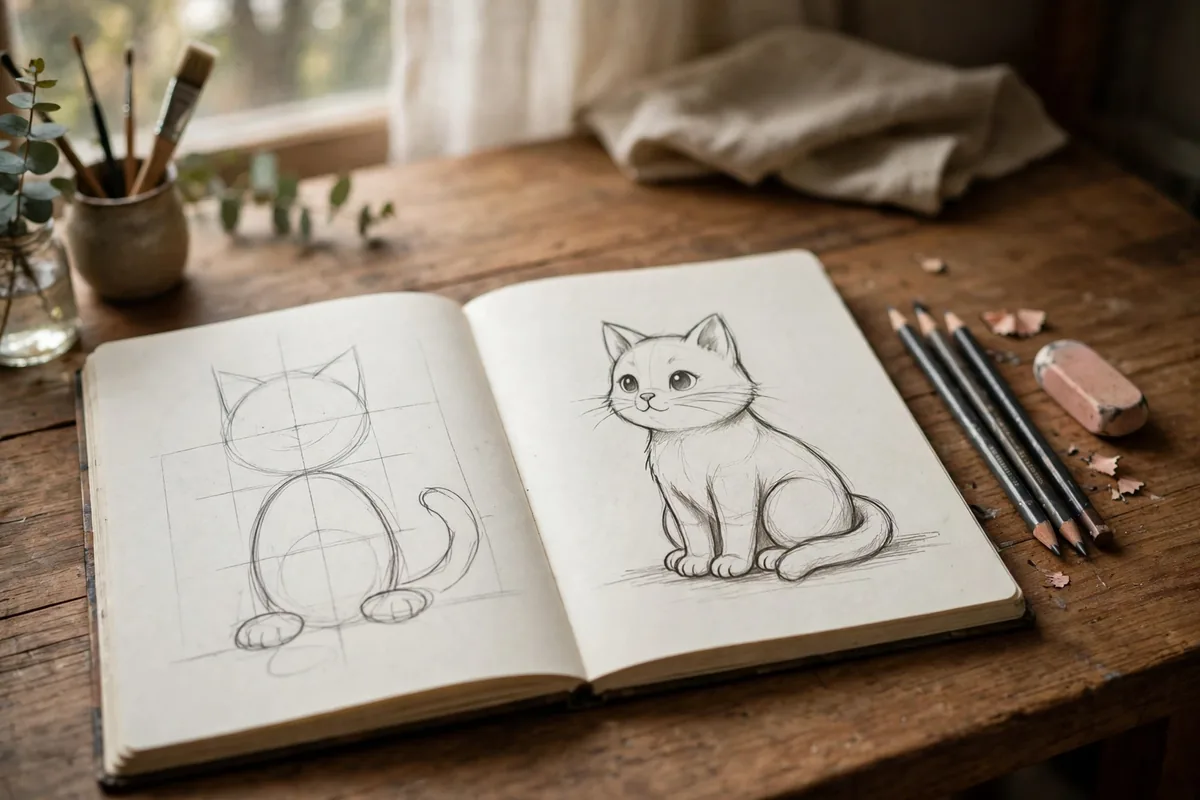
Learning how to draw a cat is one of the most rewarding first projects for any new artist. Cats have graceful shapes, expressive faces, and endless pose possibilities, so a single tutorial can teach you observation, proportion, and shading all at once. Better still, you only need a pencil, an eraser, and a sheet of paper to get started.
Many beginners assume that drawing animals requires natural talent. In reality, every convincing cat drawing begins with a few simple shapes that anyone can learn. Once you understand how those shapes fit together, you can draw a sitting cat, a sleeping cat, or even a playful kitten with confidence.
This step-by-step guide walks you through the whole process, from the first light circles to the final whiskers. Take your time, keep your lines light at the start, and remember that every artist you admire once drew their very first cat too.
What You Need to Draw a Cat
First, gather a few basic supplies. A standard HB pencil works well for the construction lines, while a softer 2B or 4B pencil helps you add darker shading later. You also need a smooth sketchbook page, a kneaded eraser for lifting mistakes gently, and a regular vinyl eraser for bigger corrections.
Next, find a clear reference photo of a cat in a simple sitting pose. A front or three-quarter view is easiest for your first attempt. If you already enjoy sketching from life, our guide on how to draw faces teaches the same observation habits that make animal drawing much easier.
Finally, set aside about thirty quiet minutes. Rushing leads to heavy, dark lines that are hard to erase, so a calm pace gives you cleaner results from the very first session.
Step 1: Build the Body From Simple Shapes
Start with a large oval for the body, tilted slightly so the cat looks natural rather than stiff. Then add a circle for the head, overlapping the top of the oval. After that, sketch a smaller oval where the chest will sit and two long shapes for the front legs.
Because cats are flexible, their bodies rarely form perfect geometry. Even so, these rough shapes give you a reliable map of the proportions. Artists who practice this construction method improve quickly, which is why shape blocking also appears in our tutorial on how to draw anime characters.
Keep every line light enough that you can barely see it from arm’s length. You will erase most of these guides later, so treat them as scaffolding rather than finished drawing.
Step 2: Add the Ears, Tail, and Legs
Now draw two triangles on top of the head circle for the ears. Cat ears sit wide apart, and their inner edges usually line up with the outer corners of the eyes. Slightly round the triangle tips, because real ears are never perfectly sharp.
Then add the tail as a long, curving tube that wraps around the side of the body. A tail that curves in front of the paws creates that classic, tidy sitting pose. Draw the back leg as a flattened oval on the side of the body, with a long foot pointing forward at the base.
If hands and paws trip you up, you are not alone. The finger-by-finger breakdown in our guide to how to draw hands uses the same shape-first approach and will strengthen your paw drawings too.
Step 3: Place the Facial Features
Draw a light horizontal line across the middle of the head circle. The eyes sit on this line, spaced roughly one eye-width apart. Cat eyes are large and almond-shaped, and they tilt very slightly toward the nose.
Below the eye line, mark the center of the face with a short vertical guide. The nose sits on this line, about two-thirds of the way down the head. Draw it as a small, soft triangle with a gentle curve underneath for the mouth.
Getting feature placement right is the secret behind every believable animal portrait. The measuring techniques in our beginner face drawing tutorial translate directly to cat faces, so review them if your features keep drifting.
Step 4: Refine the Outline
With the construction in place, start connecting your shapes with a smoother, more confident outline. Follow the circles, but let the line breathe: cheeks puff out slightly, the chest curves inward, and the back sweeps down in one relaxed arc.
Break the outline with small zigzags wherever fur changes direction, especially on the chest, cheeks, and tail. However, keep the zigzags subtle. Too many spiky lines make the cat look startled instead of soft.
As you embark on your artistic journey with drawing cats, you might discover that the principles of creating compelling art can be applied across various mediums and techniques. Just as understanding basic shapes and forms lays the foundation for drawing, so too does mastering fundamental techniques enrich other creative endeavors. For instance, the intricate art of paper folding offers a similarly rewarding experience, where patience and practice lead to elegant results. Engaging with origami for beginners introduces you to a world where simple folds transform flat sheets of paper into captivating three-dimensional figures, enhancing your overall artistic skill set and fostering a deeper appreciation for the craftsmanship involved in all forms of art. Such cross-disciplinary exploration can elevate your drawing practices and inspire new creative expressions.
Once the outline feels right, erase the construction lines inside the body. Work slowly with the kneaded eraser so you lift the guides without smudging the lines you want to keep.
Step 5: Draw the Fur and Markings
Fur is mostly about direction. Short, light strokes that follow the body’s curves will always look more realistic than long, straight lines. Build the fur in layers, and press harder only in the shadowed areas under the chin, legs, and tail.
If your cat has stripes or patches, draw their shapes first and fill them afterward. Tabby markings follow the form of the body, so stripes on the leg curve around it rather than running straight across.
Colored pencil artists can add warmth at this stage with layered oranges, grays, and creams. Our walkthrough of colored pencil drawing techniques explains how to layer colors without making them look waxy or flat.
Step 6: Shade for Depth and Form
Shading turns a flat outline into a round, living animal. Decide where your light comes from, then darken the opposite side of the body with smooth, even strokes. Keep a clean white highlight in each eye so the cat looks alert and alive.
Graphite artists often blend shading with a tissue or blending stump, while others prefer hatching. If you enjoy dry media, the value exercises in our charcoal drawing techniques guide will sharpen your shading control dramatically.
Also add a soft shadow beneath the cat. A simple ground shadow anchors the animal to the page and stops it from appearing to float.
Step 7: Add Whiskers and Final Details
Finally, draw the whiskers with quick, confident strokes that taper at the ends. Cats usually have whiskers in rows on each cheek, plus a few shorter ones above the eyes. Draw them last so they stay bright against the shaded fur.
Then darken the pupils, add a tiny nose shine, and check the drawing as a whole. Squint at it, flip the page upside down, or view it in a mirror; fresh angles reveal proportion mistakes instantly.
Digital artists can scan the finished sketch and clean it up on a tablet. Our Procreate drawing tutorial for beginners shows how to ink and color a pencil sketch without losing its hand-drawn charm.
Common Mistakes When Drawing Cats
First, many beginners make the head too small for the body. A cat’s head is surprisingly large, so compare it against the body oval before you commit to details. Second, beginners often place the ears on top of the head like a cartoon crown; real ears attach lower, at the sides of the skull.
Another frequent problem is outlining everything with the same heavy line. Vary your line weight instead: darker where forms overlap or sit in shadow, lighter where light hits the fur. This single habit makes any animal drawing look more professional.
Finally, avoid copying a reference line by line without understanding the shapes underneath. If you are brand new to drawing on paper or screen, our complete guide on how to start digital art reinforces the same fundamentals that make this cat tutorial work.
Practice Ideas to Improve Faster
Draw the same sitting pose three times this week, and you will notice each attempt getting cleaner. Then challenge yourself with a sleeping cat, which is mostly one big curve, and a walking cat, which teaches you leg positions.
You can also experiment with media once the pencil version feels easy. Try inking your sketch and tinting it with a light wash, following the layering advice in our watercolor techniques for beginners guide. Or paint the finished drawing outright, using the layering method from our acrylic painting techniques for beginners tutorial. You can also render the whole cat in one color family, the way painters practice in our gouache painting for beginners tutorial.
Most importantly, keep every attempt, even the wobbly ones. Comparing this month’s cats with next month’s is the most motivating progress tracker an artist can have.
Conclusion
You now know how to draw a cat from start to finish: block in simple shapes, place the features carefully, refine the outline, layer the fur, shade for depth, and finish with whiskers. The method works for any breed, from a fluffy Maine Coon to a sleek Siamese, because the underlying shapes stay the same.
Pick up your pencil today and draw your first cat without worrying about perfection. Each sketch teaches your eyes something new, and within a few weeks you will be surprised at how naturally the shapes come together. Happy drawing!


