
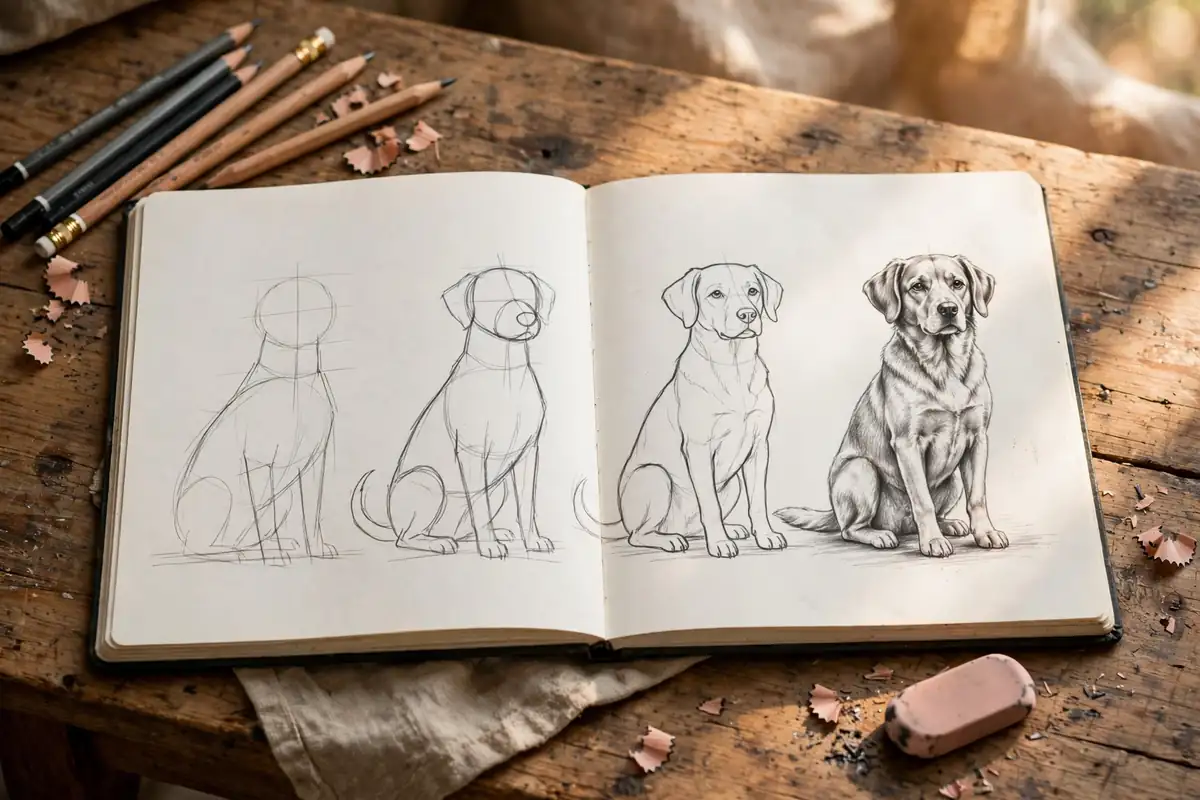
Dogs are one of the most rewarding subjects a beginner can draw. They are expressive, familiar, and full of personality, which means even a simple sketch can feel alive. If you have ever wanted to learn how to draw a cat or another animal, a dog is a wonderful next step. In this guide, you will learn how to draw a dog step by step, from the first rough shapes to a finished, shaded portrait that you will be proud to show off.
You do not need expensive supplies or years of practice to get started. All you need is a pencil, a sheet of paper, an eraser, and a little patience. By the end of this tutorial, you will understand dog proportions, facial features, fur texture, and the shading tricks that turn a flat outline into a three-dimensional animal.
What You Need to Draw a Dog
Before you begin, gather a few basic tools. A standard HB pencil works well for sketching, while a 2B or 4B pencil gives you darker lines and richer shading. Keep a kneaded eraser nearby for lifting graphite gently, and use smooth, medium-weight drawing paper so your pencil glides easily. If you already enjoy sketching for beginners, you probably own everything you need.
Choose a clear reference photo of a dog sitting or standing in a three-quarter view. A three-quarter view shows both eyes and the shape of the muzzle, which makes the drawing more interesting than a flat side profile. Pick a photo with good lighting so you can see where the shadows fall on the fur.
How to Draw a Dog: Start With Simple Shapes
Every realistic animal drawing begins with simple shapes. Instead of staring at the whole dog and feeling overwhelmed, break the body into circles, ovals, and lines that you can adjust as you go.
Step 1: Sketch the Head and Body
Lightly draw a large oval for the chest and a smaller circle for the head, leaving a gap between them for the neck. Connect the two shapes with two curved lines that form the neck. Add a horizontal guideline across the head circle to mark where the eyes will sit, and a vertical guideline down the middle to keep the face symmetrical. These guides are the same kind of construction lines artists use when they learn how to draw faces, and they make the rest of the drawing far easier.
Step 2: Place the Ears and Muzzle
Draw the ears as simple triangles or rounded flaps on top of the head, depending on the breed. A Labrador has soft, hanging ears, while a German Shepherd has tall, pointed ones. Next, add a smaller oval or boxy shape at the lower half of the head for the muzzle. Dogs have longer muzzles than cats, so give this shape enough length. Sketch a small circle at the end of the muzzle for the nose.
Step 3: Add the Legs and Tail
Draw the front legs as two long, slightly tapered rectangles from the chest down to the paws, and the back legs as angled shapes that bend at the hock joint. Keep the legs light and loose at this stage. Add the paws as small rounded ovals, and sketch the tail as a curved line that follows the dog’s mood: up and wagging for a happy dog, or low and relaxed for a calm one.
Drawing the Dog’s Face in Detail
The face is where your drawing comes to life, so take your time here. The eyes are the most important feature. Draw them as almond shapes sitting on the horizontal guideline, with a dark pupil and a tiny white highlight dot that makes the eyes look wet and alive. Leave that highlight untouched when you shade, because it creates instant sparkle.
Next, refine the nose. A dog’s nose is wide, dark, and slightly shiny, with a vertical groove down the center. Shade it dark, but leave a small lighter patch on one side to suggest a highlight. Draw the mouth as a gentle curved line below the nose, and add a short line down from the nose to the mouth. The skills you build here transfer directly to other portraits, including when you practice how to draw hands and other detailed anatomy.
Finally, shape the ears. Erase the inner construction lines and draw the ear edges with slightly wavy lines to suggest soft fur. Add a few short strokes inside the ear to show the inner ear shadow. Check the symmetry by stepping back and comparing both sides of the face, then adjust anything that looks off before you move on to shading.
How to Draw a Dog’s Fur and Body
Fur is what separates a good dog drawing from a great one. The secret is to draw fur in layers, following the direction the hair grows. On the head, fur points outward from the nose. On the chest, it flows downward. On the legs, it follows the length of the leg.
Start with light, short strokes along the outline of the body to break up the hard edge and suggest a fuzzy silhouette. Then add a second layer of slightly darker strokes in the shadow areas: under the chin, behind the ears, under the belly, and on the far side of the legs. Leave the sunlit areas mostly white or very light. This contrast between light and dark is what gives the dog its round, three-dimensional form.
For short-haired breeds like a Boxer or a Beagle, keep your strokes short and close together. For long-haired breeds like a Golden Retriever or an Old English Sheepdog, use longer, flowing strokes that overlap. If you enjoy working with tone and texture, you will also love charcoal drawing techniques, which are excellent for rich, dark fur.
Shading Your Dog Drawing
Shading turns flat shapes into a solid animal. Begin by identifying your light source. If the light comes from the upper left, the shadows will fall on the lower right side of the dog. Shade those areas with light, even layers of graphite, building up slowly rather than pressing hard all at once.
Use the side of your pencil for large areas like the body, and the tip for small details around the eyes and nose. Blend gently with a tissue or blending stump, but do not over-blend: a little visible pencil texture actually reads as fur. Keep your darkest darks for the nose, the pupils, and the deepest shadows under the ears and belly. Keep your lightest lights on the forehead, the top of the muzzle, and the chest.
Understanding light and dark becomes even easier once you study color theory for beginners, because value contrast matters just as much in color work as it does in graphite. Step back from your drawing every few minutes to check the overall balance of light and shadow.
Common Mistakes When You Draw a Dog
Beginners often make the head too big or the legs too short. A good rule of thumb is that a standing dog’s body length is roughly twice its height at the shoulder, and the head fits into the body length about two and a half times. Measuring with your pencil against your reference photo helps you catch these errors early.
Another common mistake is drawing both eyes exactly the same size in a three-quarter view. The eye farther from the viewer should look slightly smaller and narrower because of perspective. The same rule applies to the ears and the sides of the muzzle. Finally, avoid outlining everything with a heavy dark line. Real dogs do not have outlines; their edges come from the contrast between fur and background. Use soft, broken lines instead.
If you make a mistake, do not throw the drawing away. Erase lightly, adjust, and keep going. Every professional artist redraws lines many times. The patience you build here will also help when you explore how to draw anime characters, where clean line work matters just as much.
Adding Color to Your Dog Drawing
Once you feel confident in graphite, try adding color. Colored pencil drawing is a gentle way to start, because you can layer colors slowly and erase small errors. Begin with a light base layer of the dog’s main coat color, then add darker tones in the shadows and a warm highlight color where the light hits.
For a brown dog, layer golden brown over a light tan base, then add dark brown in the shadows. For a black dog, resist the urge to fill everything with black. Instead, layer dark blue, purple, and brown to create a coat that looks rich rather than flat. Leave tiny white gaps for the brightest highlights in the fur.
You can also scan your finished pencil drawing and color it digitally. A Procreate drawing tutorial for beginners shows how layers and brushes can speed up the coloring process. And if you prefer paint, watercolor techniques for beginners offer a soft, expressive way to paint your dog portrait.
Practice Exercises to Improve Quickly
The fastest way to improve is short, focused practice. Spend ten minutes a day sketching dogs from photos, and try a different breed each week. One day, draw only dog eyes. Another day, draw only ears or paws. These small studies build your visual memory faster than one long drawing session.
Try drawing the same dog twice: once slowly and carefully, and once in five minutes as a gesture sketch. The quick sketch teaches you to capture the overall pose and energy, while the slow drawing teaches you detail. Keep both versions in your sketchbook so you can see your progress over time.
Set yourself a simple challenge: draw one dog a day for thirty days. By the end of the month, you will notice that proportions come naturally, your shading looks smoother, and your dogs have real personality. Share your work with friends or an online art community for encouragement and friendly feedback.
Conclusion
Learning how to draw a dog is a skill anyone can build with simple shapes, patient observation, and regular practice. Start with light construction lines, refine the face with care, layer the fur in the direction it grows, and shade slowly to build form. Do not worry about perfection. Each drawing teaches you something new, and your tenth dog will look far better than your first.
Grab your pencil, pick a reference photo of a dog you love, and start sketching today. Your next drawing could be the one that makes someone smile and say, that looks just like my dog.
If you enjoyed learning how to draw a horse, try our step-by-step guide to drawing a dog next — the same simple-shape method makes a new animal easy to tackle.


